This guide will show you how to perform an automatic system update on Ubuntu Linux.
Sometimes, when you try to shut down the Ubuntu system, you may come across something like a screen that prevents you from turning off:

Automatic updating is performed during shutdown, please do not shut down the computer.
You may ask what this “automatic update” is and why it works without your knowledge.
The reason is that Ubuntu takes the security of your system very seriously. By default, it automatically checks for system updates daily, and if it finds any security updates, it downloads these updates and installs them on its own. For regular system and application updates, it notifies you through the Software Updater tool.
Since all this happens in the background, you won’t even understand this until you try to shut down your system or try to install the applications yourself.
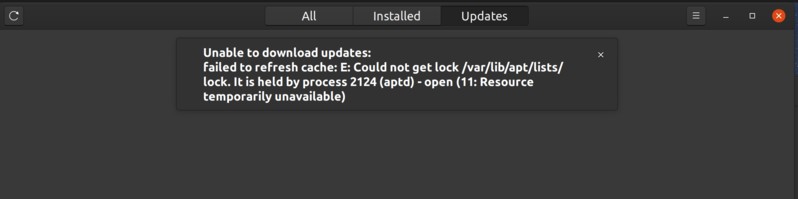
Attempting to install new software while performing these automatic updates causes you to see a lock error.
You can turn off automatic updates, but this will mean that you have to constantly check and update the Ubuntu system.
Do you really need to disable auto-updates?
Please note that this is a security feature. Linux allows you to do almost everything on your system, even disable these security features.
But, in my opinion, as an ordinary user, you should not turn off automatic updates. In the end, it keeps your system safe.
For the security of your system, you can put up with the minor inconvenience that accompanies automatic updates.
Now that you have received a warning and think that it’s better to do the additional task of updating the system manually, let’s see how to handle automatic updates.
How to disable automatic updates in Ubuntu
As always, there are two ways to do this: the GUI and the command line. I will show you both methods.
I used Ubuntu 20.04, but the instruction is also suitable for Ubuntu 18.04 or any other version of Ubuntu.
Method 1: Disable automatic updating in Ubuntu using the Updates program
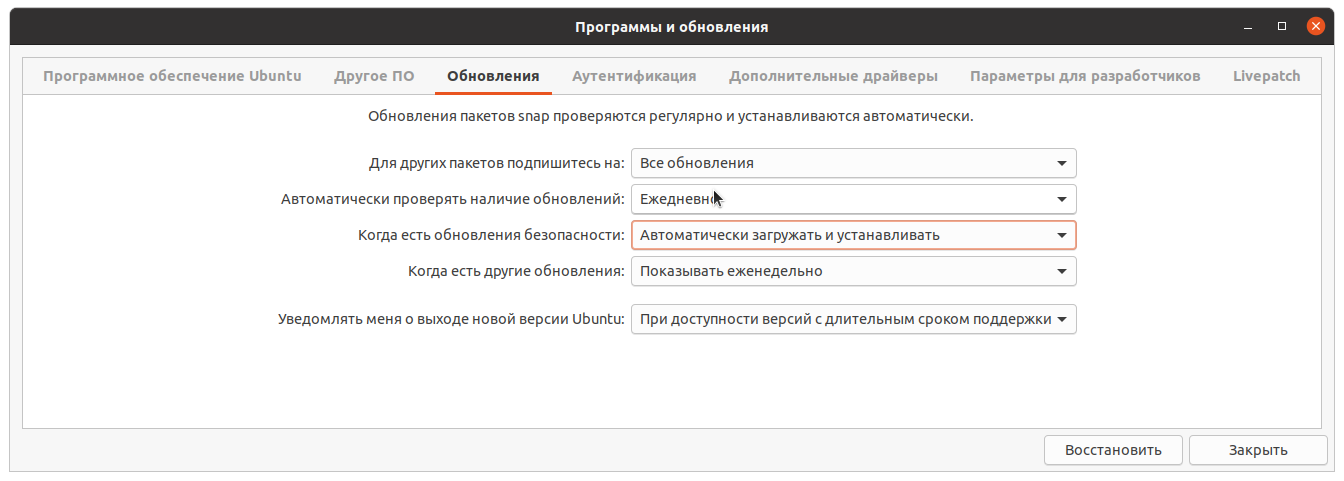
Go to the menu and find “Software and Updates.”
Go to the Updates tab and find “Automatically check for updates.” The default value is Daily.
You can change it to Never, and your system will never check for updates on its own. And if she does not check for updates, she will not find new updates to install.
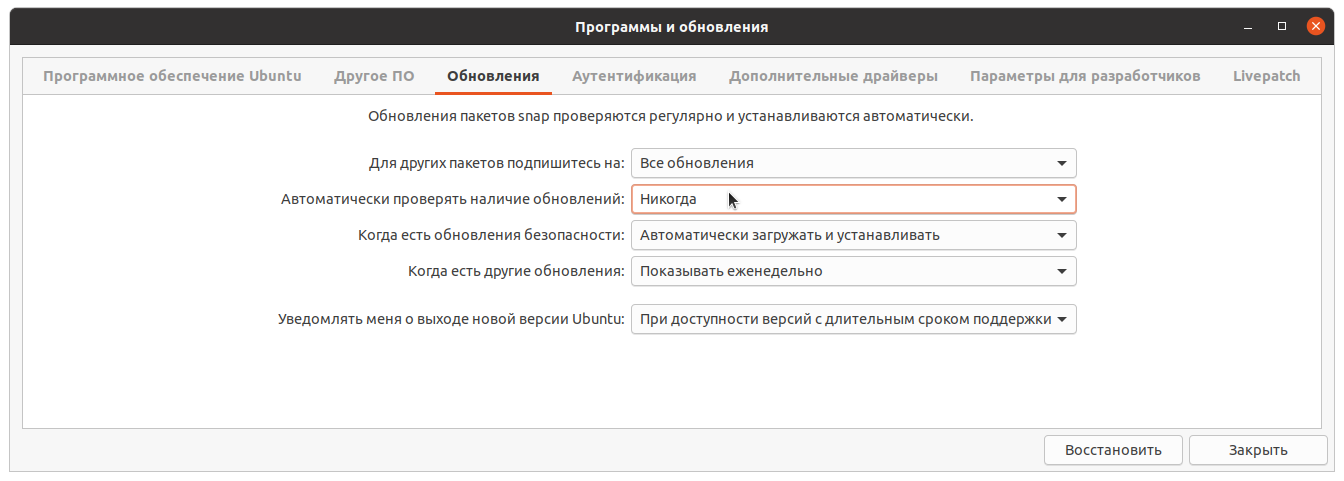
If you do this, you must update your system manually from time to time. But this is additional work, and you may forget to do it.
A bit better way to handle auto updates in Ubuntu
Personally, I would advise you to check for updates yourself. If you do not want to install updates automatically, you can change this behavior to receive notifications about the availability of security updates.
Set the “Automatically check for updates” option to “Daily” and change the “If there are security updates” option to “Show immediately” instead of “Download and install automatically.”
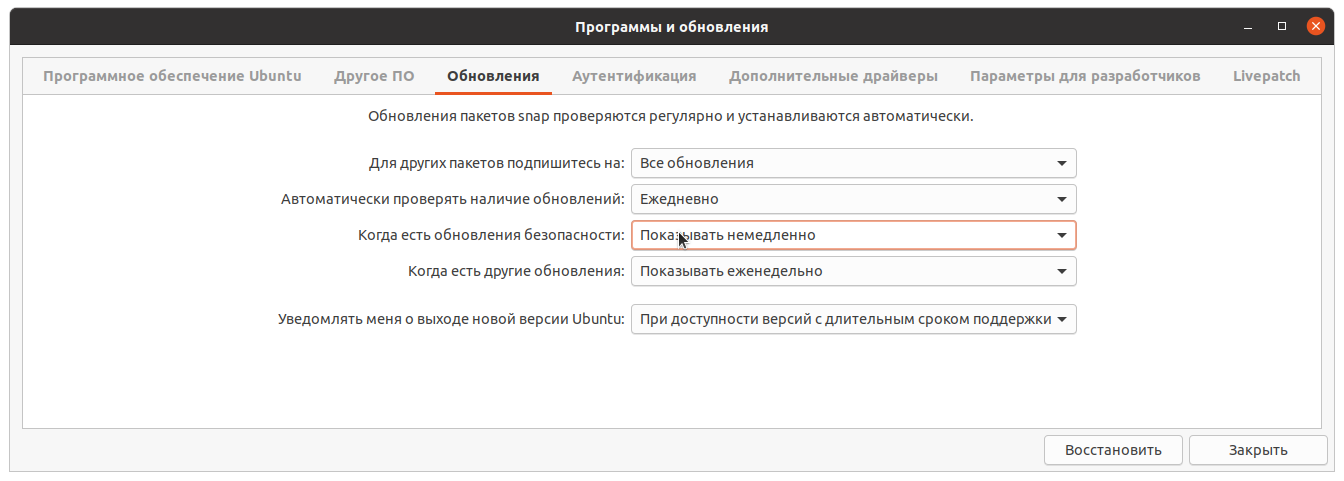
Thus, the system checks for updates and, if there are any, instead of automatically installing them in the background, the software update tool notifies you of updates for your system. Your system already does this for regular system and software updates.
With this setting, you will not see “automatic update in progress” when your system shuts down. However, you can still encounter the error “could not get the lock”, because two separate processes cannot use the apt package manager at the same time.
I think this is the best solution, isn’t it?
As I promised, both with the graphical interface and with the command line methods, I will show you how to disable automatic updates in the terminal.
How to disable automatic updating in Ubuntu using the command line
Auto-update settings can be found in the /etc/apt/apt.conf.d/20auto-upgrades file. The default text editor in the Ubuntu terminal is Nano, so you can use this command to edit the configuration file:
sudo nano /etc/apt/apt.conf.d/20auto-upgradesNow, if you do not want your system to automatically check for updates, you can change the value of APT :: Periodic :: Update-Package-Lists to 0.
APT :: Periodic :: Update-Package-Lists "0";
APT :: Periodic :: Unattended-Upgrade "0";
If you want her to check for updates, but not install automatic updates automatically, you can install it as follows:
APT :: Periodic :: Update-Package-Lists "1";
APT :: Periodic :: Unattended-Upgrade "0";
Conclusion…
Automatic security updates are automatically enabled for any reason, and I recommend that you leave it as it is. A couple of small troubles are not worth the risk of the security of your system. What do you think? Write in the comments below